Step by step guide on how to install WordPress on your website
WordPress is the most popular platform for creating a content management websites.
It is also popular for having a professional business website with blog section for companies selling products and services.
The reason for its popularity is that it is too easy to design, create and manage a WordPress website without technical knowledge.
Another reason is its functionalities through plugins which let you have any feature on your website with a few clicks. When a newbie wants to start a website, it becomes a concern for him to install WordPress on the purchased web server space and create a website based on it.
Here are the steps on how to install WordPress on your site. Note that different web hosts have different tools to install WordPress from the cPanel.
How To Install WordPress On GoDaddy Hosted Website
GoDaddy is one of the popular web hosts for hosting WordPress websites. If you have bought GoDaddy’s managed WordPress plan, it would be a cake walk to install WordPress. Simply log in to your account and go to My Products. In the next screen, find web hosting just below domains. Click on Manage button there.
Find your website in the next screen where you want to install WordPress and click on Manage button corresponding to that. Note, you can have multiple websites under one account and hence, you have to select the website where you want to install WordPress.
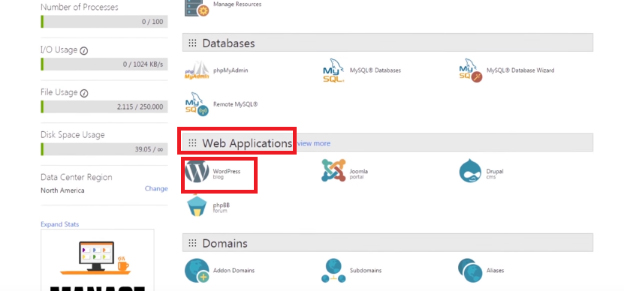
The next page is the cPanel where you need to head over to Web Applications section. There you will find WordPress. Double click on that and in the next screen, click on Install This Application button. Next, you have to provide Admin username and password through which you will be able to access the dashboard of your WordPress website.
How To Install WordPress On BlueHost Hosted Website
BlueHost is the officially recommended web host of WordPress. Naturally, it has the most number of WordPress websites hosted on its servers. Installing WordPress on a website that has BlueHost as its server is super simple. It uses MOJO marketplace which requires a few clicks to complete the installation process. Simply login into to your BlueHost account.
On the top menu, you will find Hosting menu option. Click on that and below that, click on cPanel where MOJO marketplace tool is waiting for your attention.
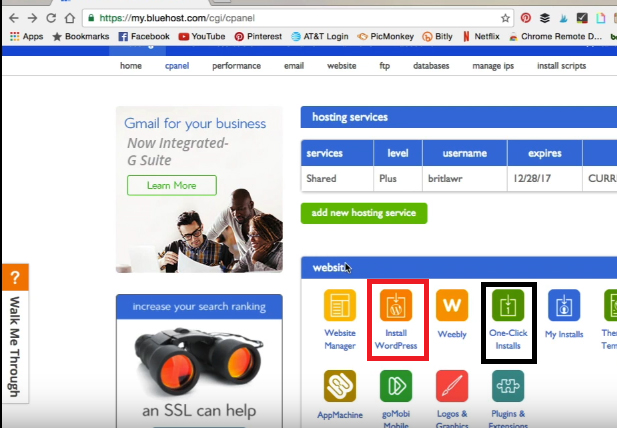
On the cPanel screen, find Install WordPress option under Website tab. There is another option named One-Click Install. Both of them take you to MOJO marketplace. In the next screen, click on Install button, and you would be asked to select the domain name of the website where you want to install WordPress.
Moving on, it will ask for the site name, admin username, and password. After providing those, click on Install Now button.
It would take a few moments to install WordPress as you would be able to see through a progress bar. Once the installation is over, you will see its notification on the screen. Then you can go to the Admin URL and login to your WordPress website’s dashboard.
How To Install Wordpress On InMotion Hosting and SiteGround Hosted Websites
Both InMotion Hosting and SiteGround web hosts are quite popular and host a large number of WordPress websites, and the count is always increasing. Because of various security features, people go for them ditching BlueHost which is the officially recommended web host for WordPress.
InMotion and SiteGround use Softaculos tool available in the cPanel for letting its user install WordPress for their website. Just like MoJo Marketplace, it is also an auto-installer.
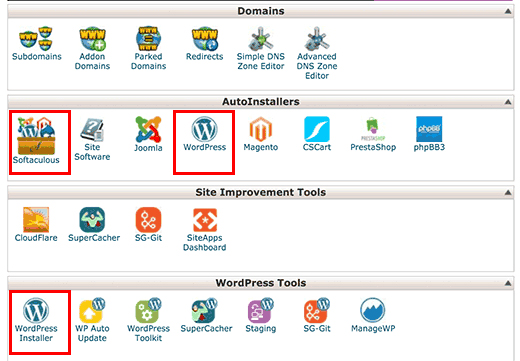
Login to your cPanel account directly and find the heading Auto-Installers. There you will find two options – Softaculous and WordPress. Click anyone and in the next screen, select Install tab. Then provide your domain name, site name, site description, admin username, password and email address.
There are other options like language, themes to install and other advanced settings which you can opt to omit and click on Install button directly. Even if you select a theme or language, you will be able to change it later on.
Once all is done, the installation will start and you will see a progress bar and when it reaches 100%, you will receive Admin URL to login to your dashboard.
How To Install WordPress On HostGator Hosted Website
How To Install WordPress On HostGator Based Website
HostGator is undoubted the cheapest web host for WordPress websites. People who have a low budget generally opt for HostGator.
Furthermore, there are always some huge seasonal discounts going on the site, and you can also find coupon codes on the coupon sites to cut down you price significantly. HostGator uses QuickInstall tool to let its user install WordPress effortlessly.
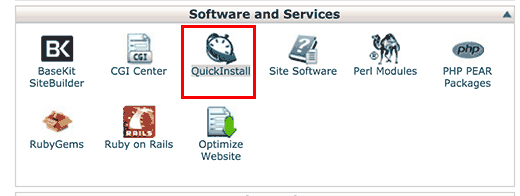
To install WordPress on your site, log into your HostGator’s account. Go to cPanel and scroll downwards to find Software and Services heading. Below that, you will find QuickInstall is listed. Click on that, and you will reach QuickInstall Page where you have to click on WordPress option on the top menu.
Finally, you will get to see a button named Install WordPress, click on that and fill in the details of the site and admin credentials and wait for the installation to get completed.
How To Install Wordpress Manually Using FTP
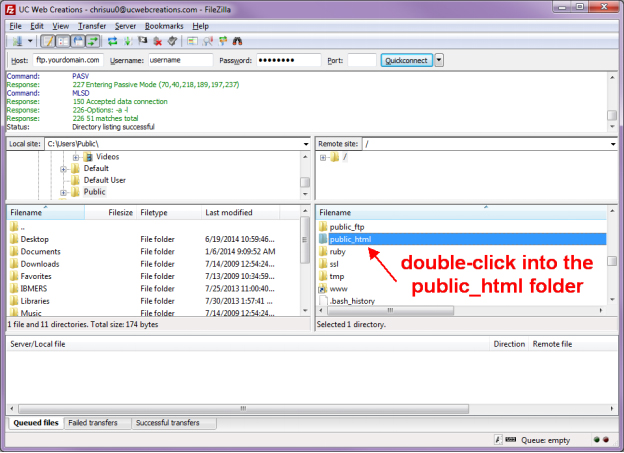
Advanced users upload WordPress manually after making a few changes in the original files of WordPress for technical reasons. This technique is applicable for all web hosts. To install manually, you would need FTP software. FileZilla is the most popular, and you need to down the latest version of WordPress from the official site of WordPress.
Open the FTP software and login to the cPanel. You will have to go to the web directory and be inside public_html folder where you need to transfer the downloaded WordPress files. Then you have to go to the cPanel through the browser ad create a default database by providing required credentials.
Once the uploading Wordpress files and creating the database are complete, type the URL of your website and press enter on the address bar of the browser. You will be asked to select language, enter database details which you created earlier and provide site details like site name, admin username, and password and finally, you have to click on Install WordPress button to finish the installation.
Then go to your admin login page, and login successfully to land on your site’s dashboard and start designing your website.
![]() Sonnal S Sinha is a passionate writer as well as WordPress and WooCommerce rockstar who loves to share insights on various topics through his engaging blog posts. He runs a successful website design and digital marketing company. With 15+ years of experience in WordPress theme development, he strives to inform and inspire readers with his thought-provoking content. He helps thousands of small and medium businesses and startups create a unique online presence. Follow Sonnal S Sinha for your regular dose of knowledge and inspiration.
Sonnal S Sinha is a passionate writer as well as WordPress and WooCommerce rockstar who loves to share insights on various topics through his engaging blog posts. He runs a successful website design and digital marketing company. With 15+ years of experience in WordPress theme development, he strives to inform and inspire readers with his thought-provoking content. He helps thousands of small and medium businesses and startups create a unique online presence. Follow Sonnal S Sinha for your regular dose of knowledge and inspiration.
Do check out our free WordPress themes and WordPress themes bundle