Add Sticky Posts in WordPress Custom Post Type Archives
You can add sticky posts in WordPress custom post type archives and make your post different and worth reading.
Table of Contents
Every website owner should look forward to making their content quality better along with better content representation.
Content is always the king but if it is not well presented, even good quality content does not make it big.
The best way to represent content different from others is by using UL elements that are not common but very attractive. One of such thing is sticky posts.
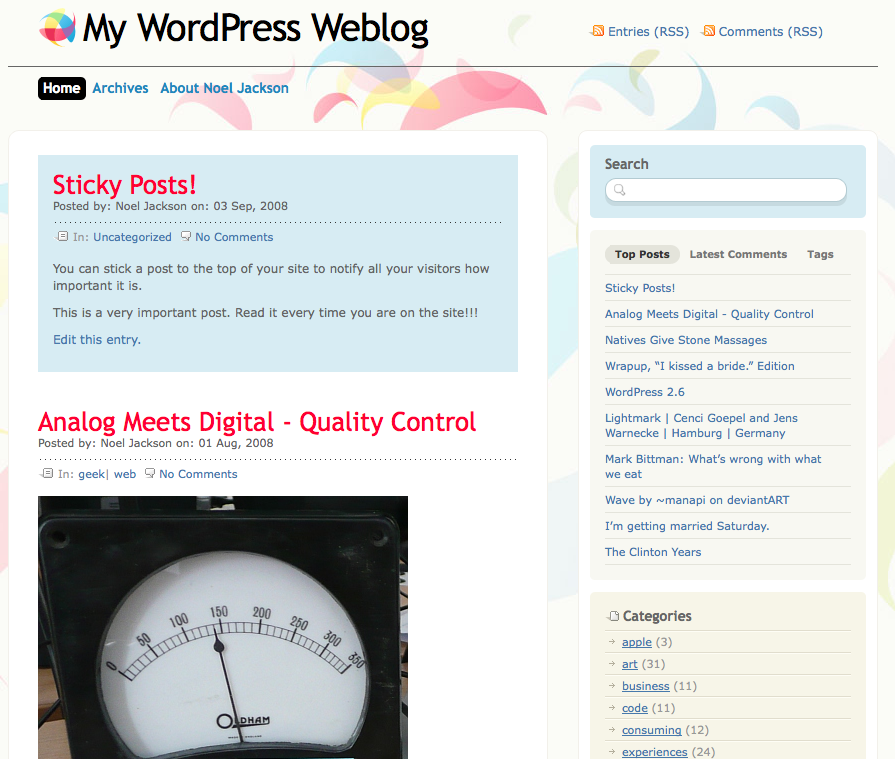
You can highlight important points or show affiliate links through stick post.
It instantly makes your web content different and better than others and it will help you create a complete brand by using it in most of the content page you have on your website and your readers will get into a habit as well which will help to in the long run.
How To Add Sticky Posts in WordPress Custom Post Type Archives Using Plugin –
Step 1. To add sticky posts, you need to install and activate the plugin named Sticky Custom Post Types.
Go to Admin Dashboard and from the left menu, select Plugins and click on Add New from the dropdown menu.
Search for the plugin by its name and install and activate it.
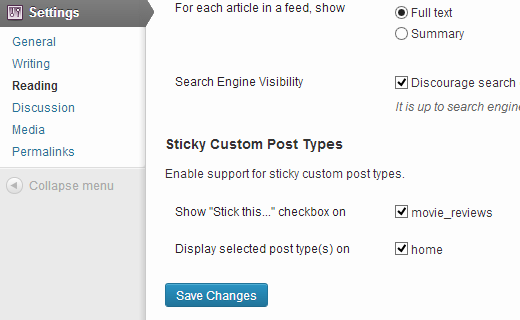
Once done, you have to come back to the Dashboard and go to Settings from the left menu and click on Reading from the dropdown.
In the new screen, you have to scroll down and you have to select the position where you want Stick This Option to be enabled. It could be homepage or any particular post type as well.
By default, WordPress shows sticky posts only on the home page and therefore, you have to enable in for other post types as per your requirement.
For example, if you have movie review custom post type or coupon code custom post type, you can select where the sticky post will appear.
Step 2. Now, it is time to add sticky posts in WordPress custom post type archives on different positions and make them appear differently.
For that, you have to create an archive template for your custom post type already present on your website.
Create a file named archive-post-type.php and then go to theme’s archive.php file and copy the entire code inside it and paste it in your archive-post-type.php file.
Then if you know coding, you can modify the code as per your requirement to create any template you need. Then upload the file to your theme’s directory where archive.php file is.
Step 3. Then you have to edit the important file functions.php and paste the following code there. You have to go to Dashboard, Appearance and click on Editor. File the functions.php file there and add it.
function wpb_cpt_sticky_at_top( $posts ) {
    // apply it on the archives only
    if ( is_main_query() && is_post_type_archive() ) {
        global $wp_query;
        $sticky_posts = get_option( 'sticky_posts' );
        $num_posts = count( $posts );
        $sticky_offset = 0;
        // Find the sticky posts
        for ($i = 0; $i ID, $sticky_posts ) ) {
                $sticky_post = $posts[$i];
                // Remove sticky from current position
                array_splice( $posts, $i, 1 );
                // Move to front, after other stickies
                array_splice( $posts, $sticky_offset, 0, array($sticky_post) );
                $sticky_offset++;
                // Remove post from sticky posts array
                $offset = array_search($sticky_post->ID, $sticky_posts);
                unset( $sticky_posts[$offset] );
            }
        }

        // Look for more sticky posts if needed
        if ( !empty( $sticky_posts) ) {
            $stickies = get_posts( array(
                'post__in' => $sticky_posts,
                'post_type' => $wp_query->query_vars['post_type'],
                'post_status' => 'publish',
                'nopaging' => true
            ) );
            foreach ( $stickies as $sticky_post ) {
                array_splice( $posts, $sticky_offset, 0, array( $sticky_post ) );
                $sticky_offset++;
            }
        }

    }

    return $posts;
}
add_filter( 'the_posts', 'wpb_cpt_sticky_at_top' );
// Add sticky class in article title to style sticky posts differently
function cpt_sticky_class($classes) {
            if ( is_sticky() ) :
            $classes[] = 'sticky';
            return $classes;
        endif;
        return $classes;
                }
    add_filter('post_class', 'cpt_sticky_class');
The above code makes sure that your sticky post stays on the top of the custom post type archives.
If you know coding, you can change the position as per your requirements.
Step 4. Now, a sticky post does not look good without color and for that, you have to open Stylesheet from the Editor and paste the following.
.sticky {
background-color:#ededed;
background-image:url('http://example.com/wp-content/uploads/featured.png');
background-repeat:no-repeat;
background-position:right top;
}
As you can see, there is an image which you have to upload as per your wish as to how you want your sticky post to appear.
That is how you add sticky posts in WordPress custom Post Type Archives and now, it will appear on the top of every custom post type archives.
Cool Things You Can Do With Sticky Posts In WordPress –
Now that you know how to add sticky posts in WordPress Custom Post Type Archives, you can extend your knowledge to apply in different areas and here are the things you can do with the sticky post.
1. Expiring Sticky post
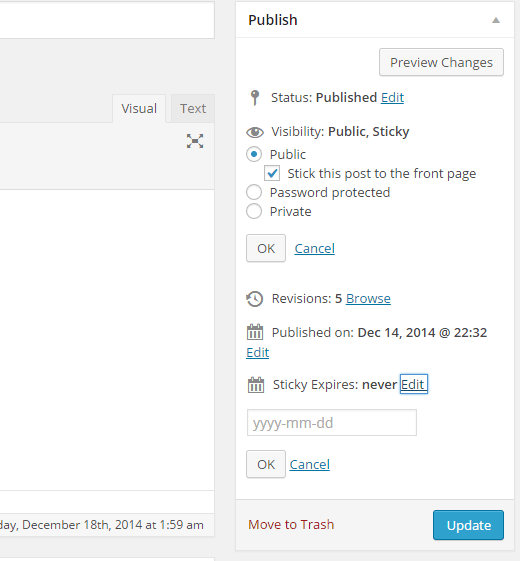
If you are using to highlight a special event or to show affiliate links and coupon codes, you can create a hype by automatically disabling the sticky posts.
For that, you need to install the plugin Expire Sticky Posts and set the expiry date.
This will come really handy.
2. Displaying Latest Sticky Post
You must be using sticky posts only for a few featured posts.
But with time, your featured posts disappear under the burden of new featured posts. To revive them, you can have custom archive pages.
Paste the following code in the functions.php file. This will create a shortcode and paste the shortcode anywhere you want to display them.
function wpb_latest_sticky() {
/* Get all sticky posts */
$sticky = get_option( 'sticky_posts' );
/* Sort the stickies with the newest ones at the top */
rsort( $sticky );
/* Get the 5 newest stickies (change 5 for a different number) */
$sticky = array_slice( $sticky, 0, 5 );
/* Query sticky posts */
$the_query = new WP_Query( array( 'post__in' => $sticky, 'ignore_sticky_posts' => 1 ) );
// The Loop
if ( $the_query->have_posts() ) {
$return .= '<ul>';
while ( $the_query->have_posts() ) {
$the_query->the_post();
$return .= '<li><a href="' .get_permalink(). '" title="' . get_the_title() . '">' . get_the_title() . '</a><br />' . get_the_excerpt(). '</li>'
}
$return .= '</ul>'
} else {
// no posts found
}
/* Restore original Post Data */
wp_reset_postdata();
return $return;
}
add_shortcode('latest_stickies', 'wpb_latest_sticky');
3. Styling Sticky Posts
If you want to make your sticky post stand out, you need to make it stylish. Here is the code you need to paste in stylesheet for decoration.
.sticky {
background-color:#ededed;
border:1 px solid #f5f5f5;
color:#272727;
padding:5px;
}
.sticky:before {
  content: "Featured";
  color: #FFF;
  background: #f20000;
  padding: 10px;
  display: inline-block;
  text-align: right;
  float: right;
  font-weight: bold;
  text-transform: uppercase;
}
There are various things you can do with sticky post and you need it to make your custom posts stand out.
Now that you have decided on the theme and the layout for your website, all that’s left is to get some good quality content on there.
The first thing that you need to do is to organize your content and set the information architecture in place; usually with most WordPress themes especially for blogs, it goes something akin to this, topic> category> tag> title and once your users drill down to the post, they should be able to review it.
The problem though is that most users’ attention is limited to a bare few seconds per page and you may want to make it easier for them to find the relevant posts with ease.
That’s why you should start using sticky posts in WordPress custom post type archives; it’s easy and does not cost anything extra.
You may have to download a plugin or two but the basic set up is easy and can be done in a matter of seconds. Just check out the instructions posted below and soon you should be able to utilize sticky posts in word press custom post type archives with ease.
With sticky posts, you can ensure that your audience accesses the relevant posts right away; you can even set an expiration date on these sticky posts so that they do not clutter up space.
The one advantage to using sticky posts is that it makes your content stand out from the rest and your customers no longer have to drill all the way down to find something interesting to read; instead, they can access it right on the front page thanks to the sticky posts.
These sticky posts can even help you streamline your branding strategy and enable your website to get more traction online.
While content is king and good content goes a long way to enabling your website to land more traffic, often users do not bother to search for older posts and often just move on. Given this, it makes more sense to use sticky posts for those important posts and get them displayed right on the front page.
When it comes to sticky posts, you can either download and install the ‘sticky custom post type’ plugin or go for the manual version.
The latter requires you to be familiar with coding so if that’s not your cup of tea, then you may want to stick with the plugin which automates the process neatly.
All you have to do is to download and activate the plugin. Once you have activated it, you need to head over to the admin dashboard, check plugins and from the scroll down list, choose “add new”.
Now search for the relevant plugin by name and click on install. That should do the trick and the new plugin should be installed, now all that you have to do is to activate it and now, head over to admin dashboard, settings and choose “reading”.
Here you can decide where you want your sticky posts to go and customize it as per your preference. Soon you should be set and be able to publish your first sticky post online.

